Water Tubes Proving Impossible To Install
I did say, when starting this project that I had misgivings about the boiler, and for several reasons. But here’s the worst thing – it’s impossible to install the water tubes!
I managed to install three water tubes, but as explained on the previous page that was only by brute force and mauling them into place.
Here is a repeat of the photo of three (of five) tubes in place:-
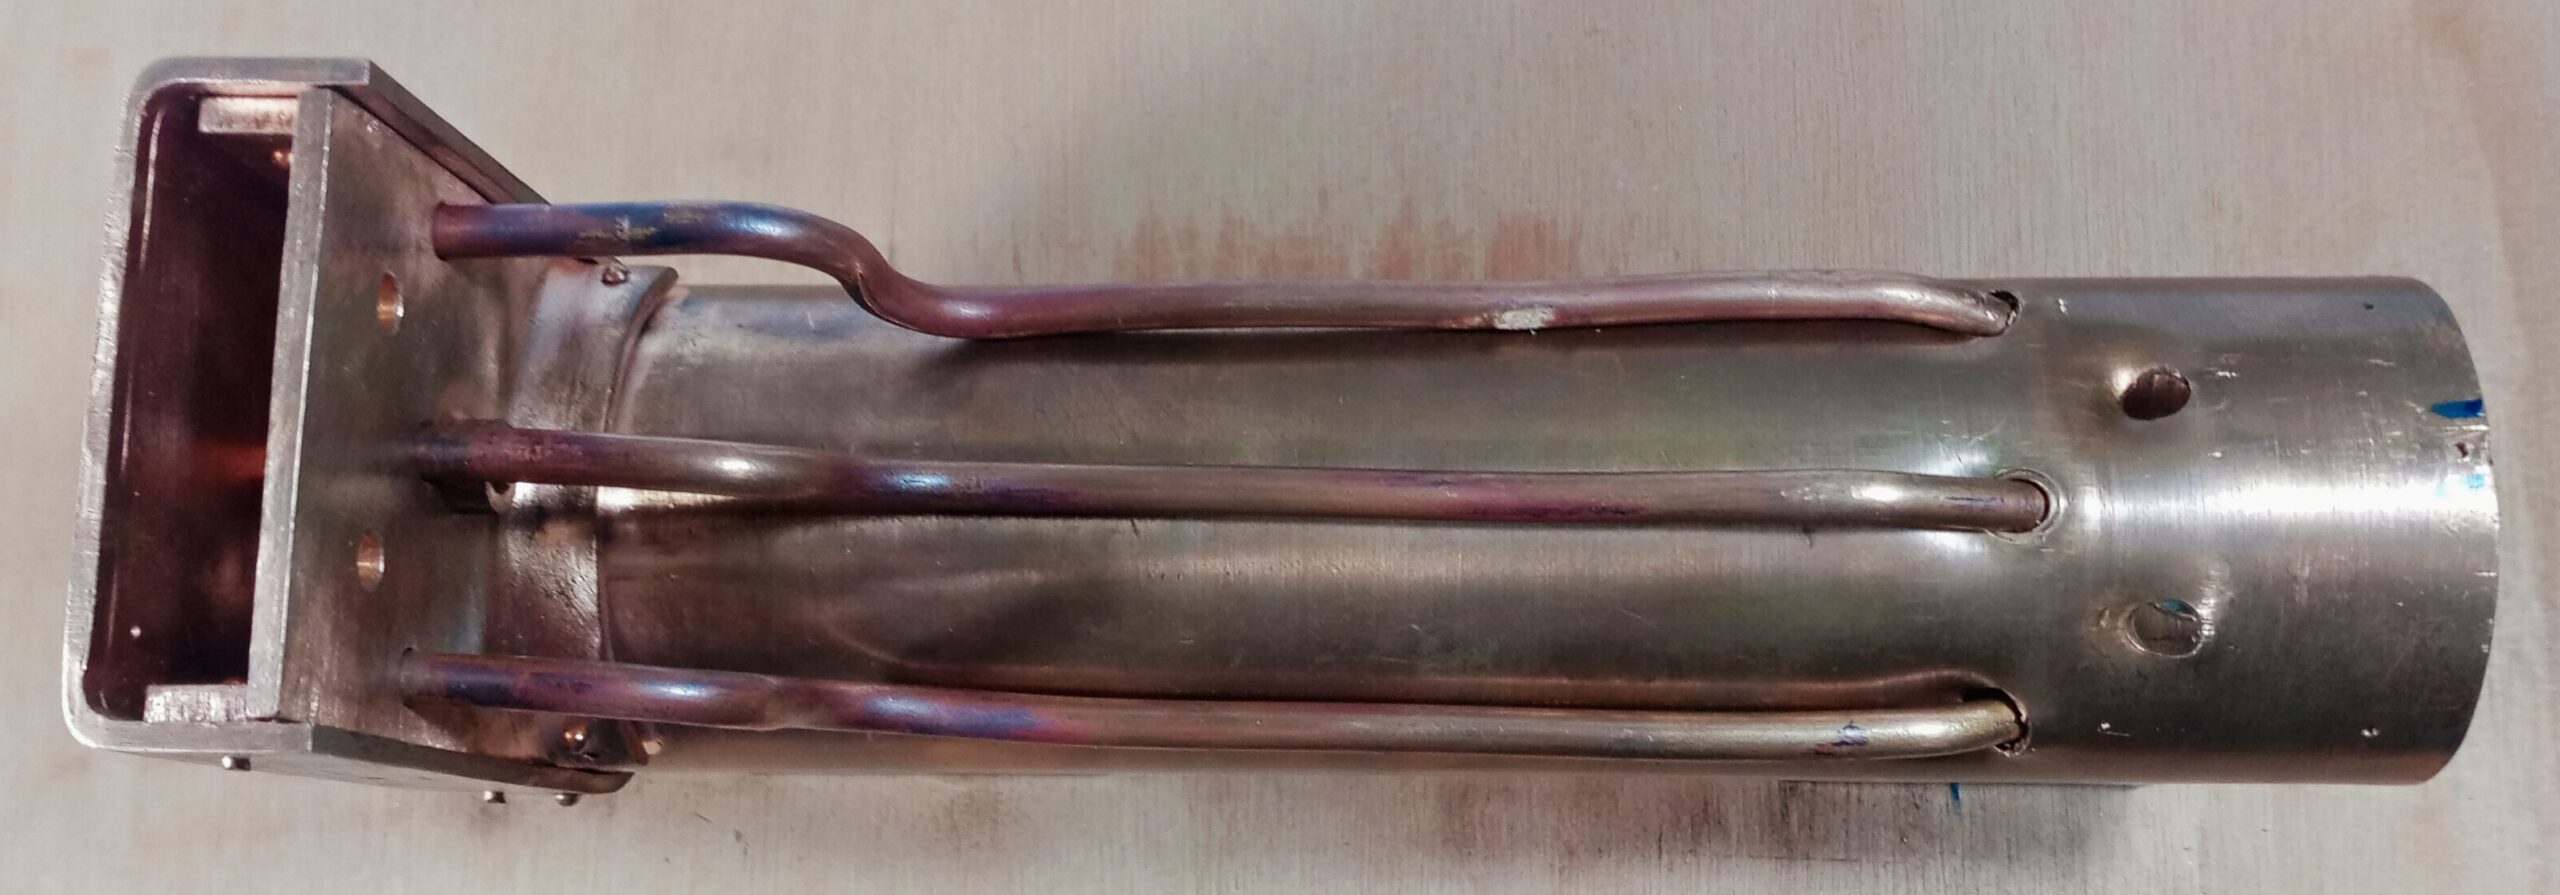
BLTE Boiler Assembly – Three Water Tubes
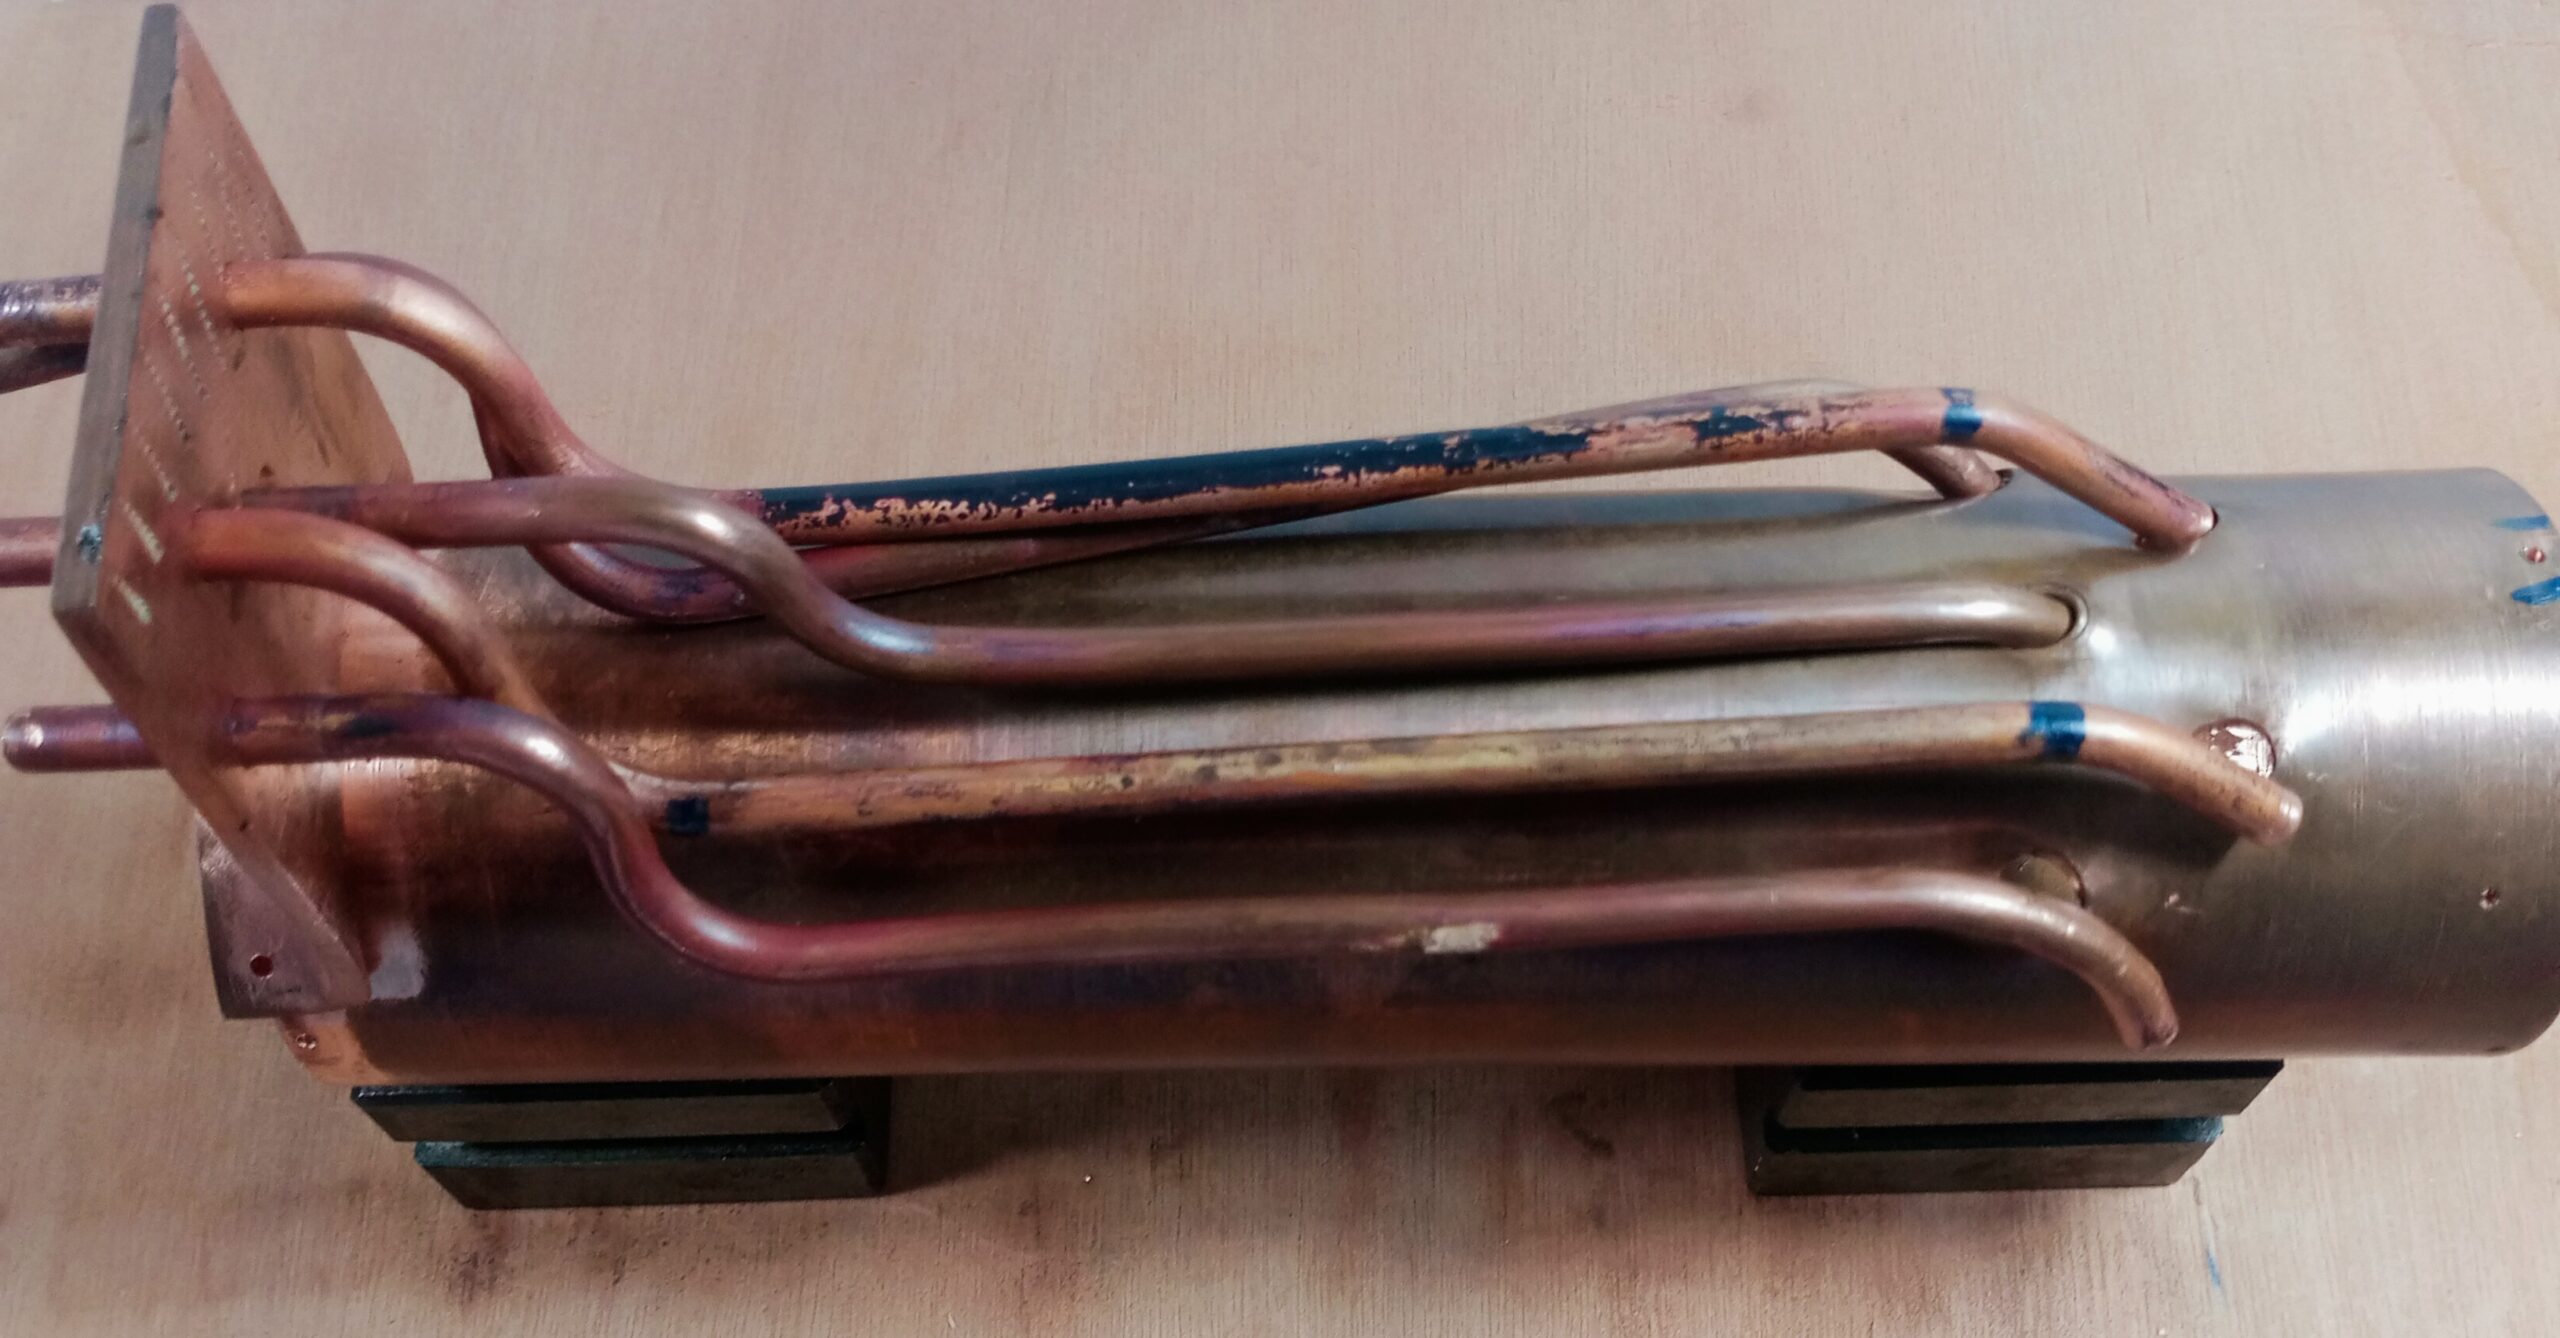
Beautifully Bent water Tubes – Ruined
Here are some photos of the water tubes being bent, beautifully bent and mangled:-

Boiler Shell Holes -or – Boiler Hell Holes!
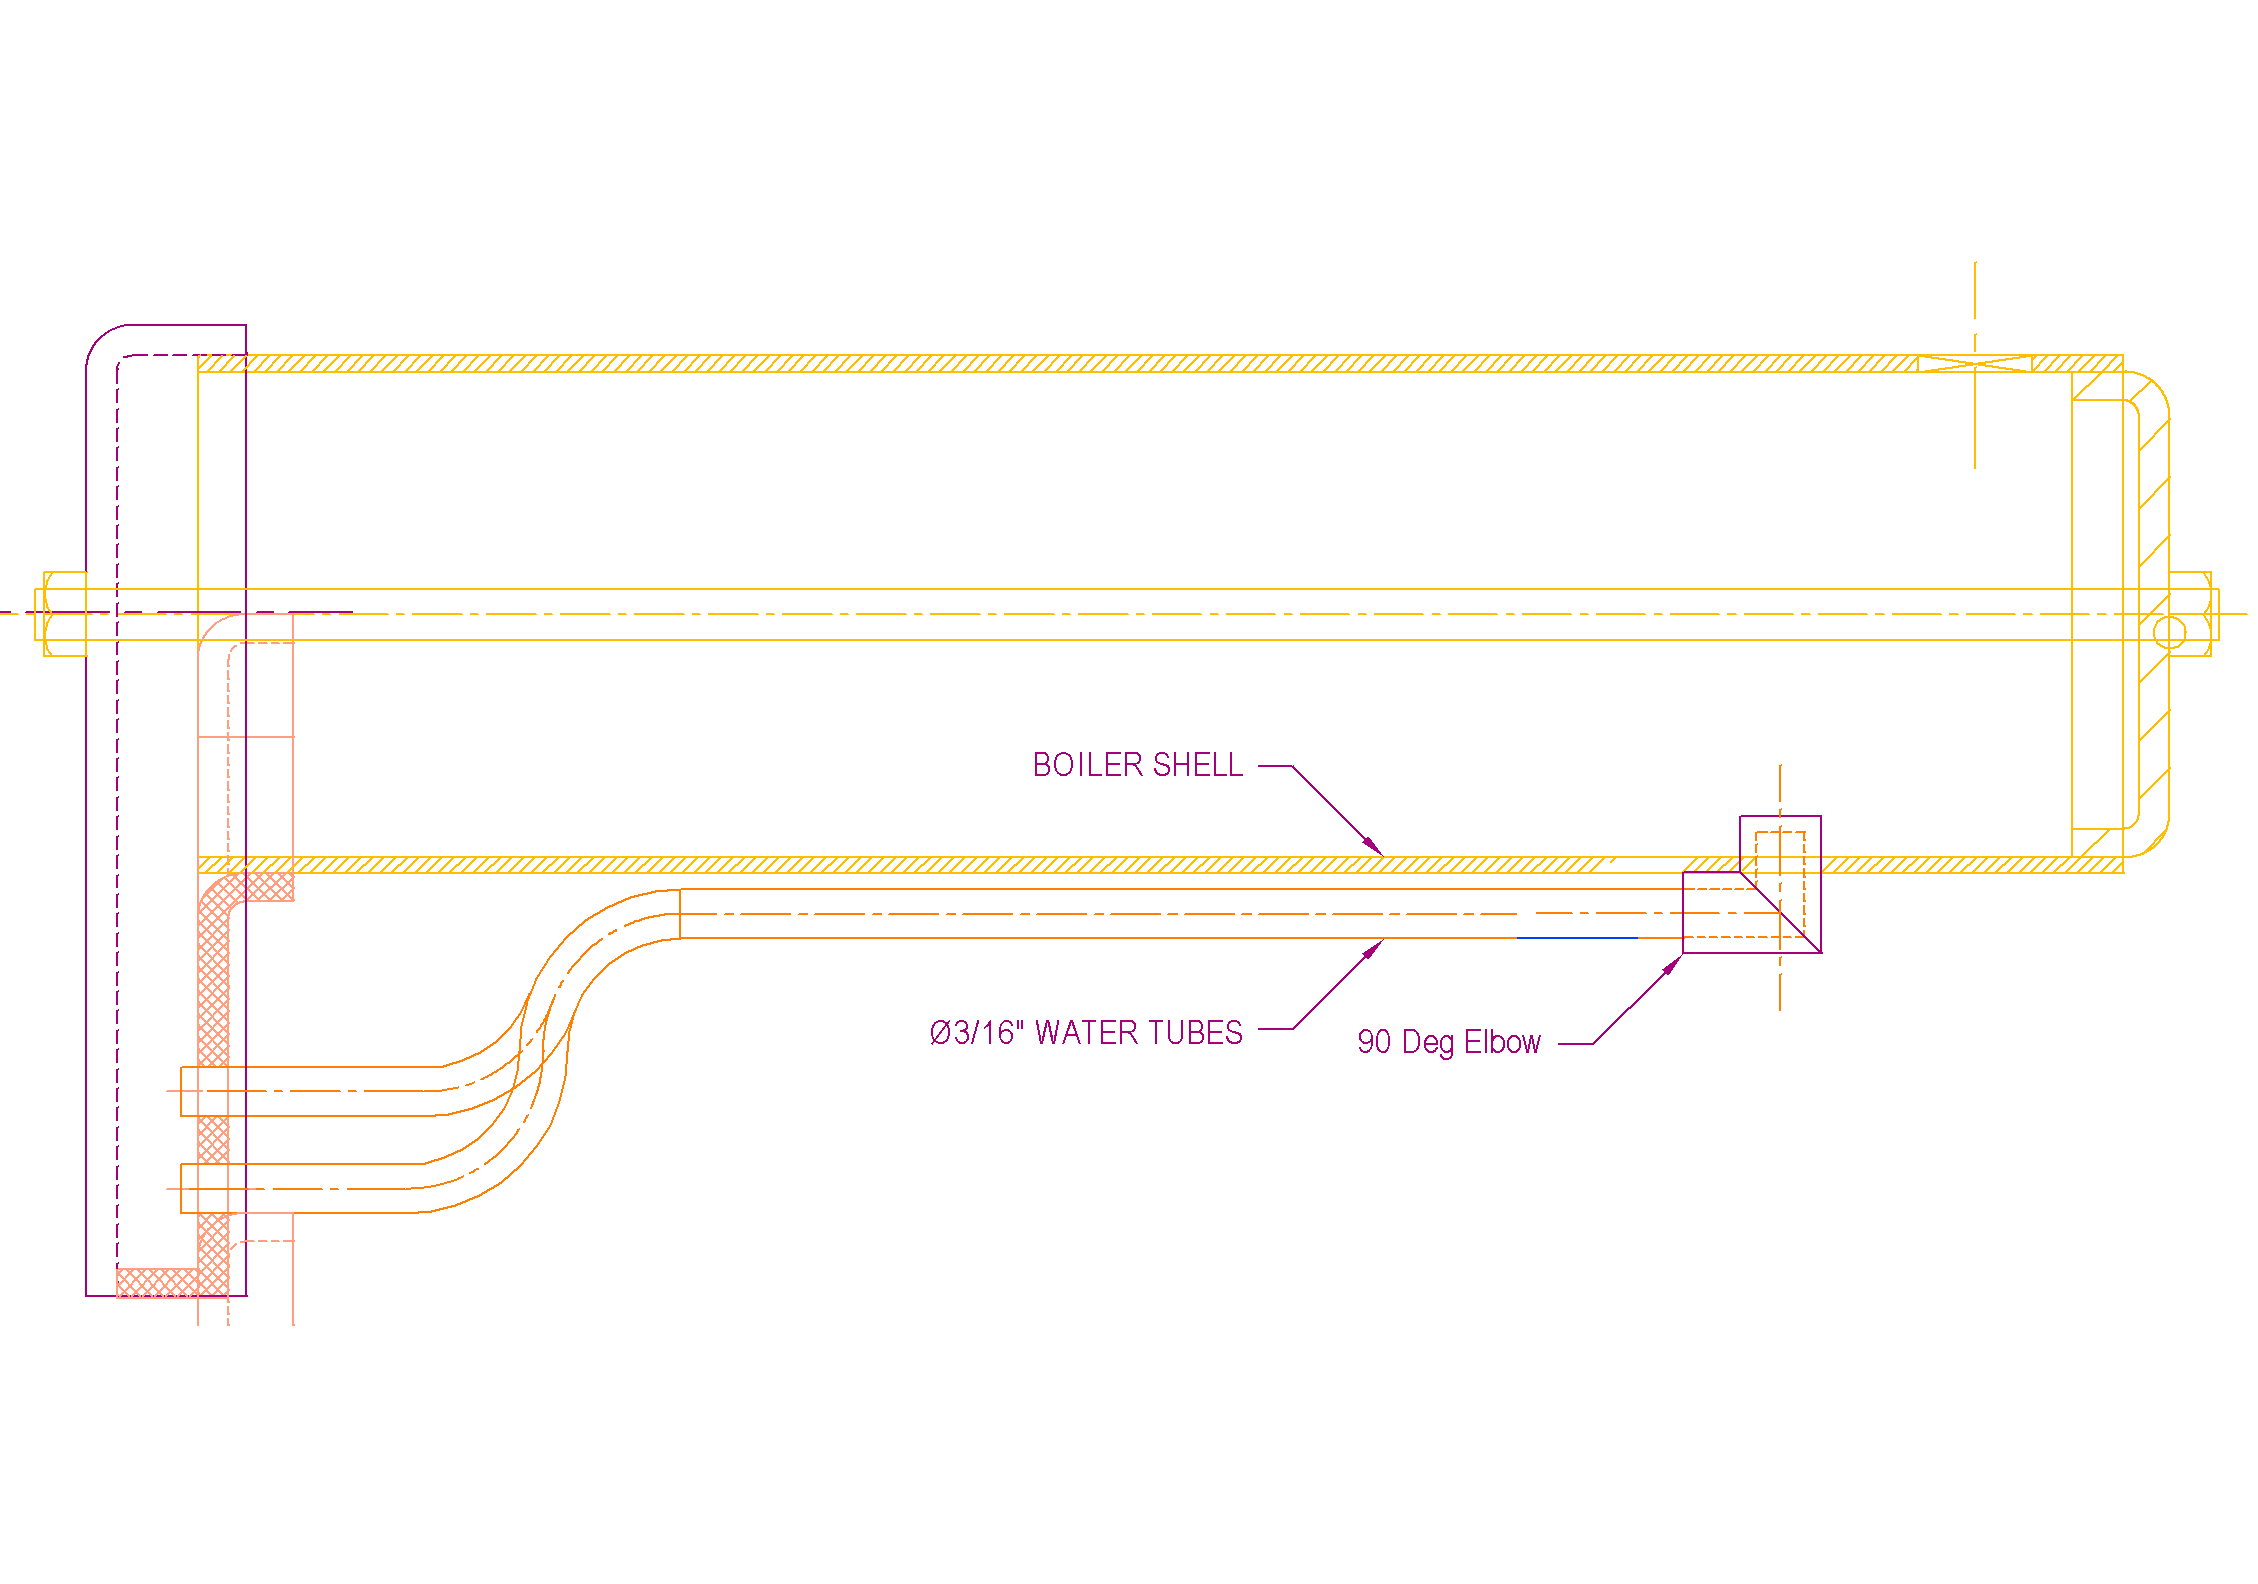
First a simplified CAD drawing showing what the boiler and water tubes are supposed to look like:-
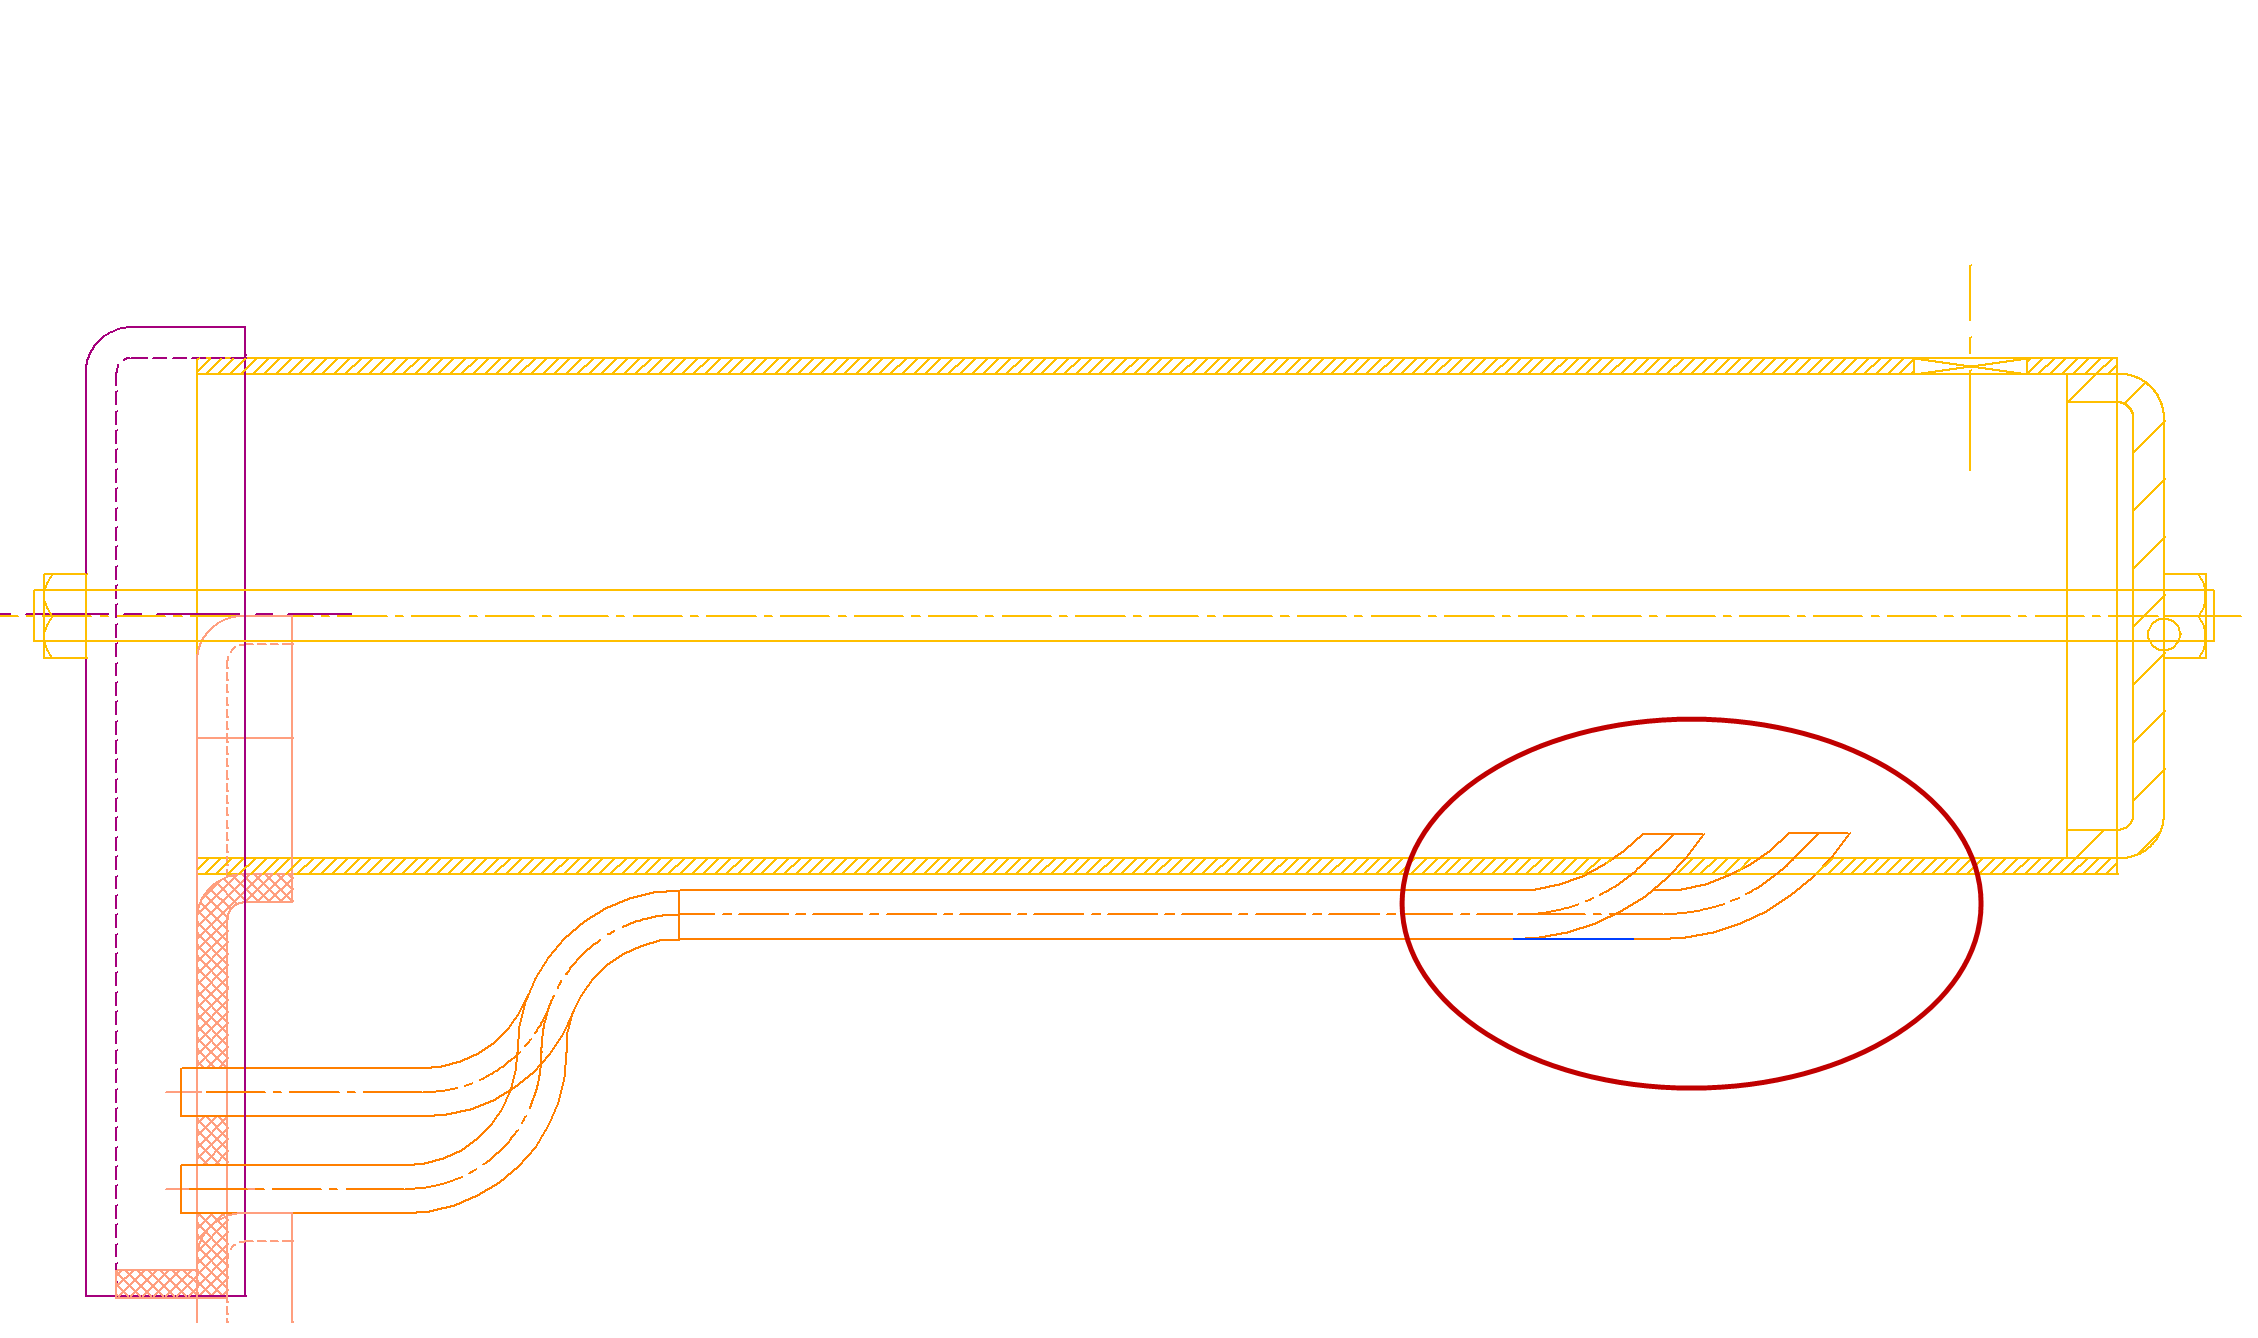
BLTE CAD Drawing Boiler Section Showing Tubes
I’ve circled the boiler (s)hell holes.
And here’s a photo of reality:-
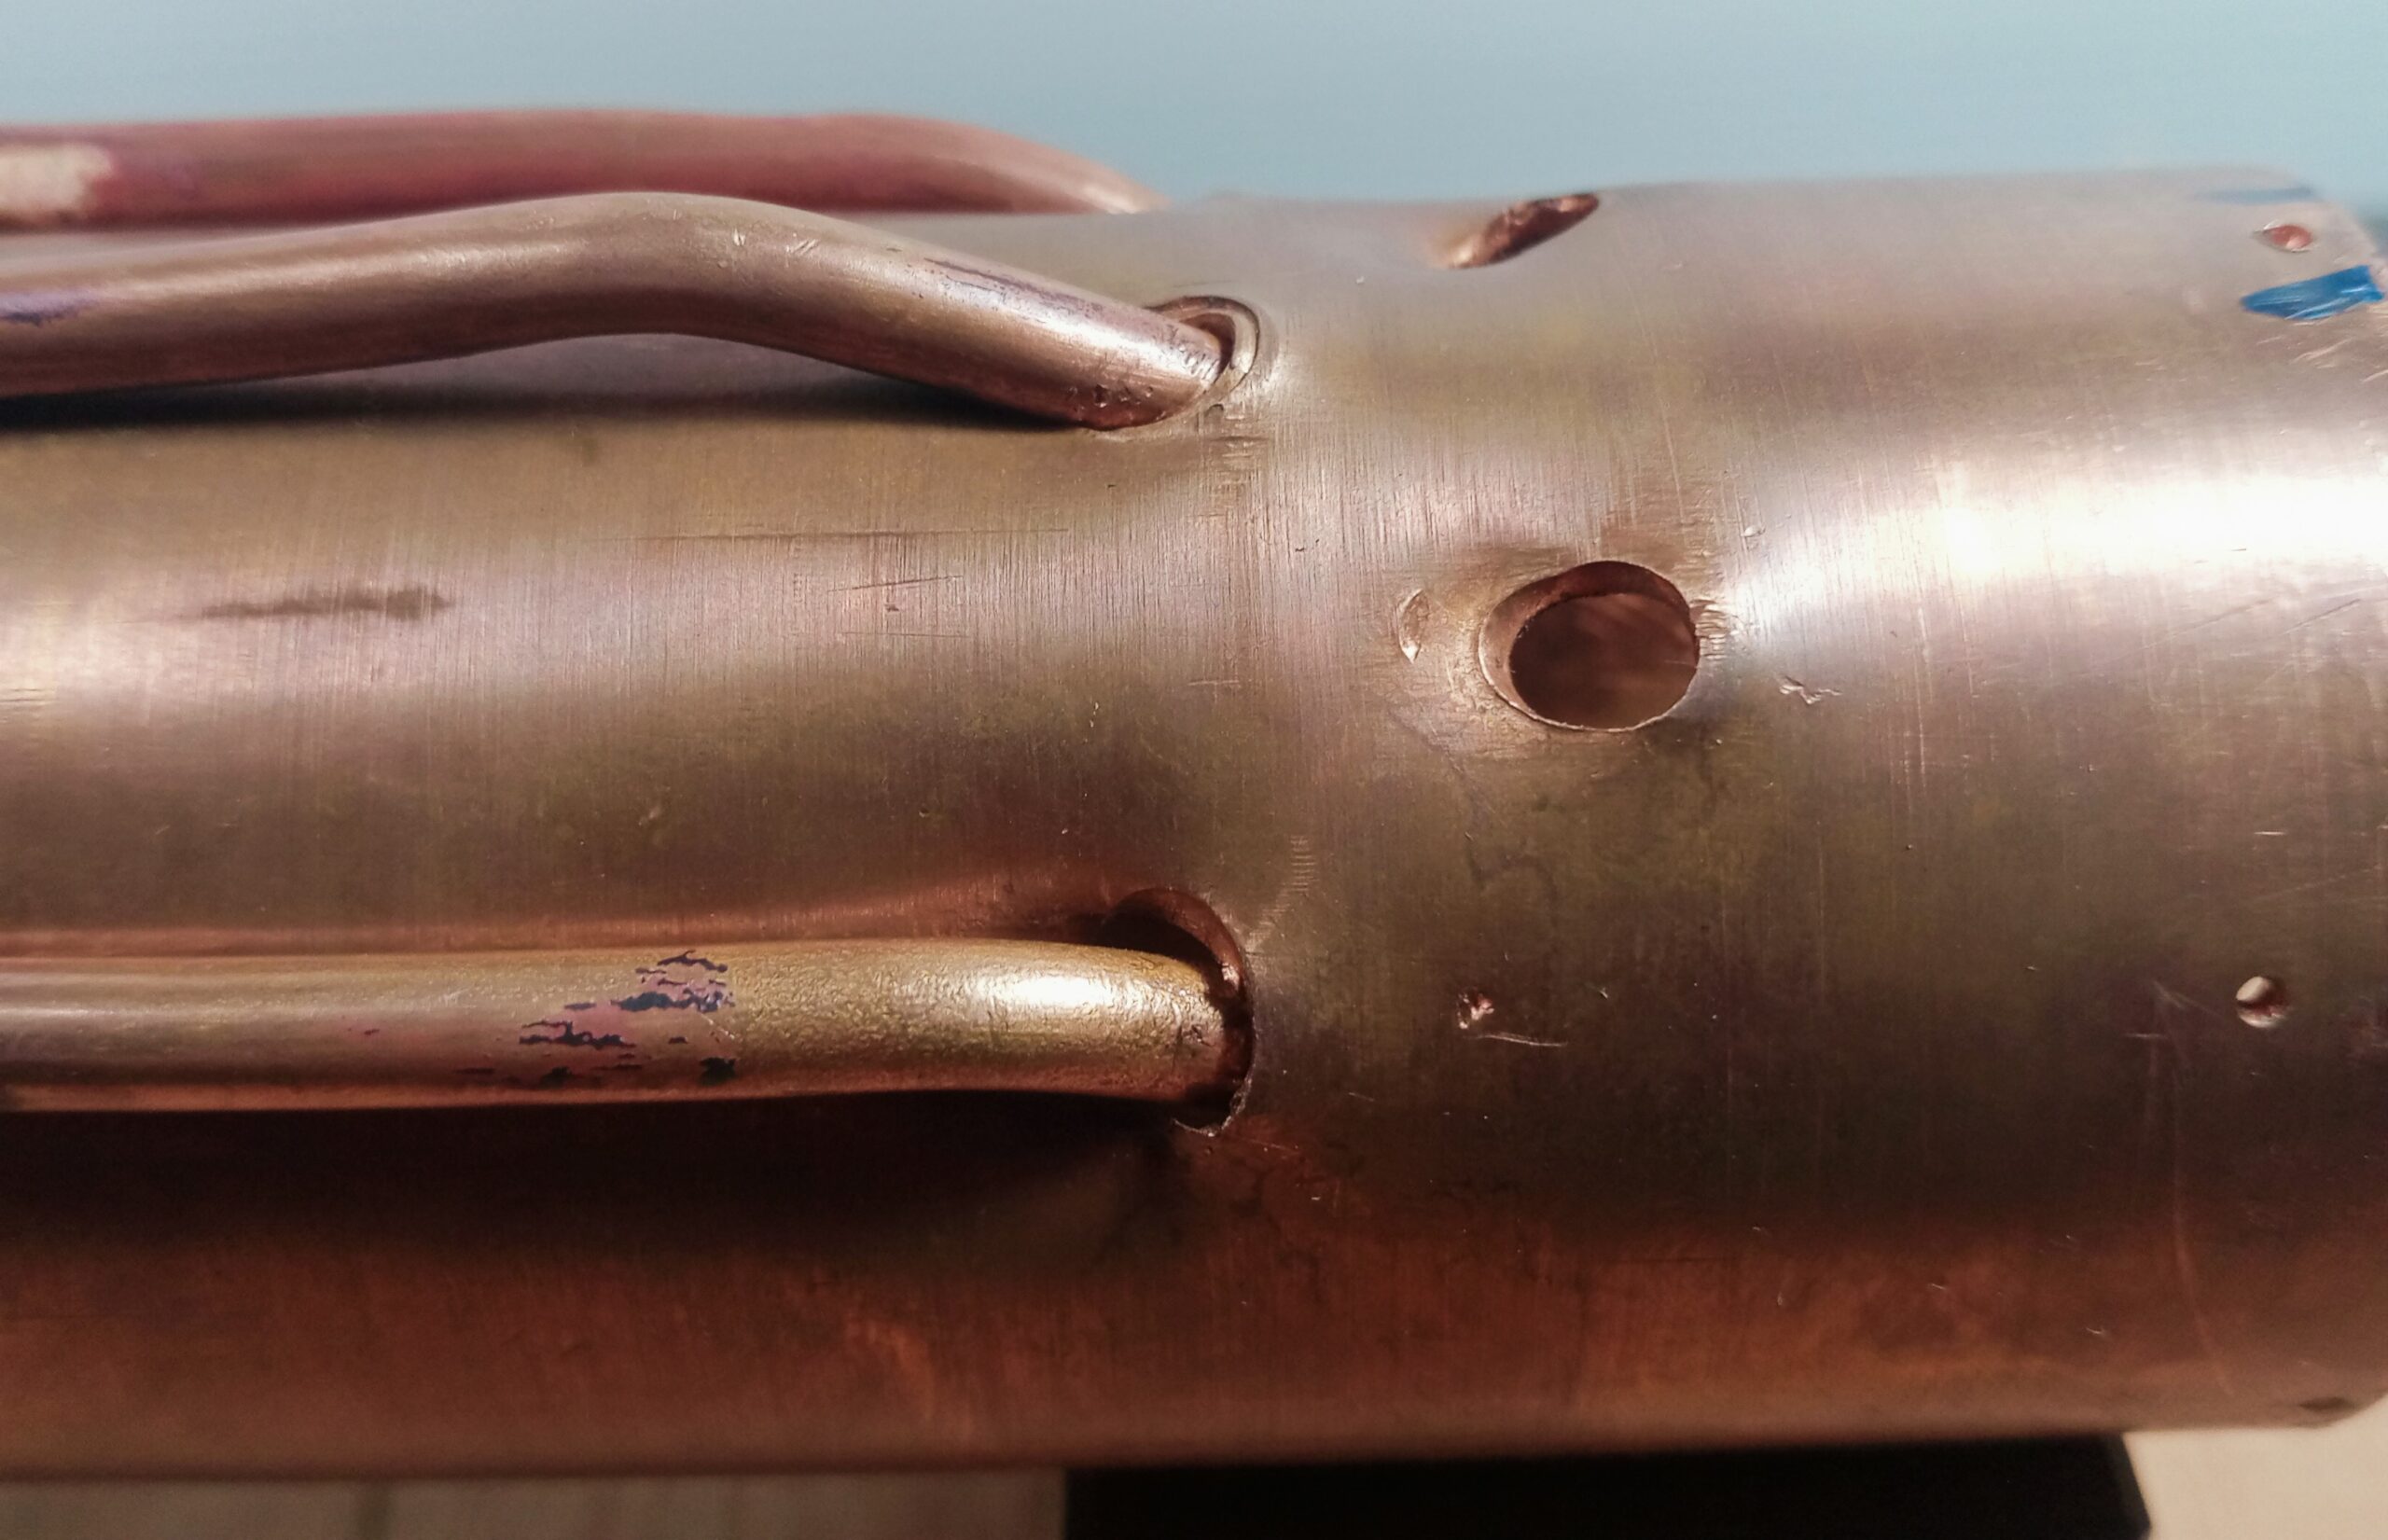
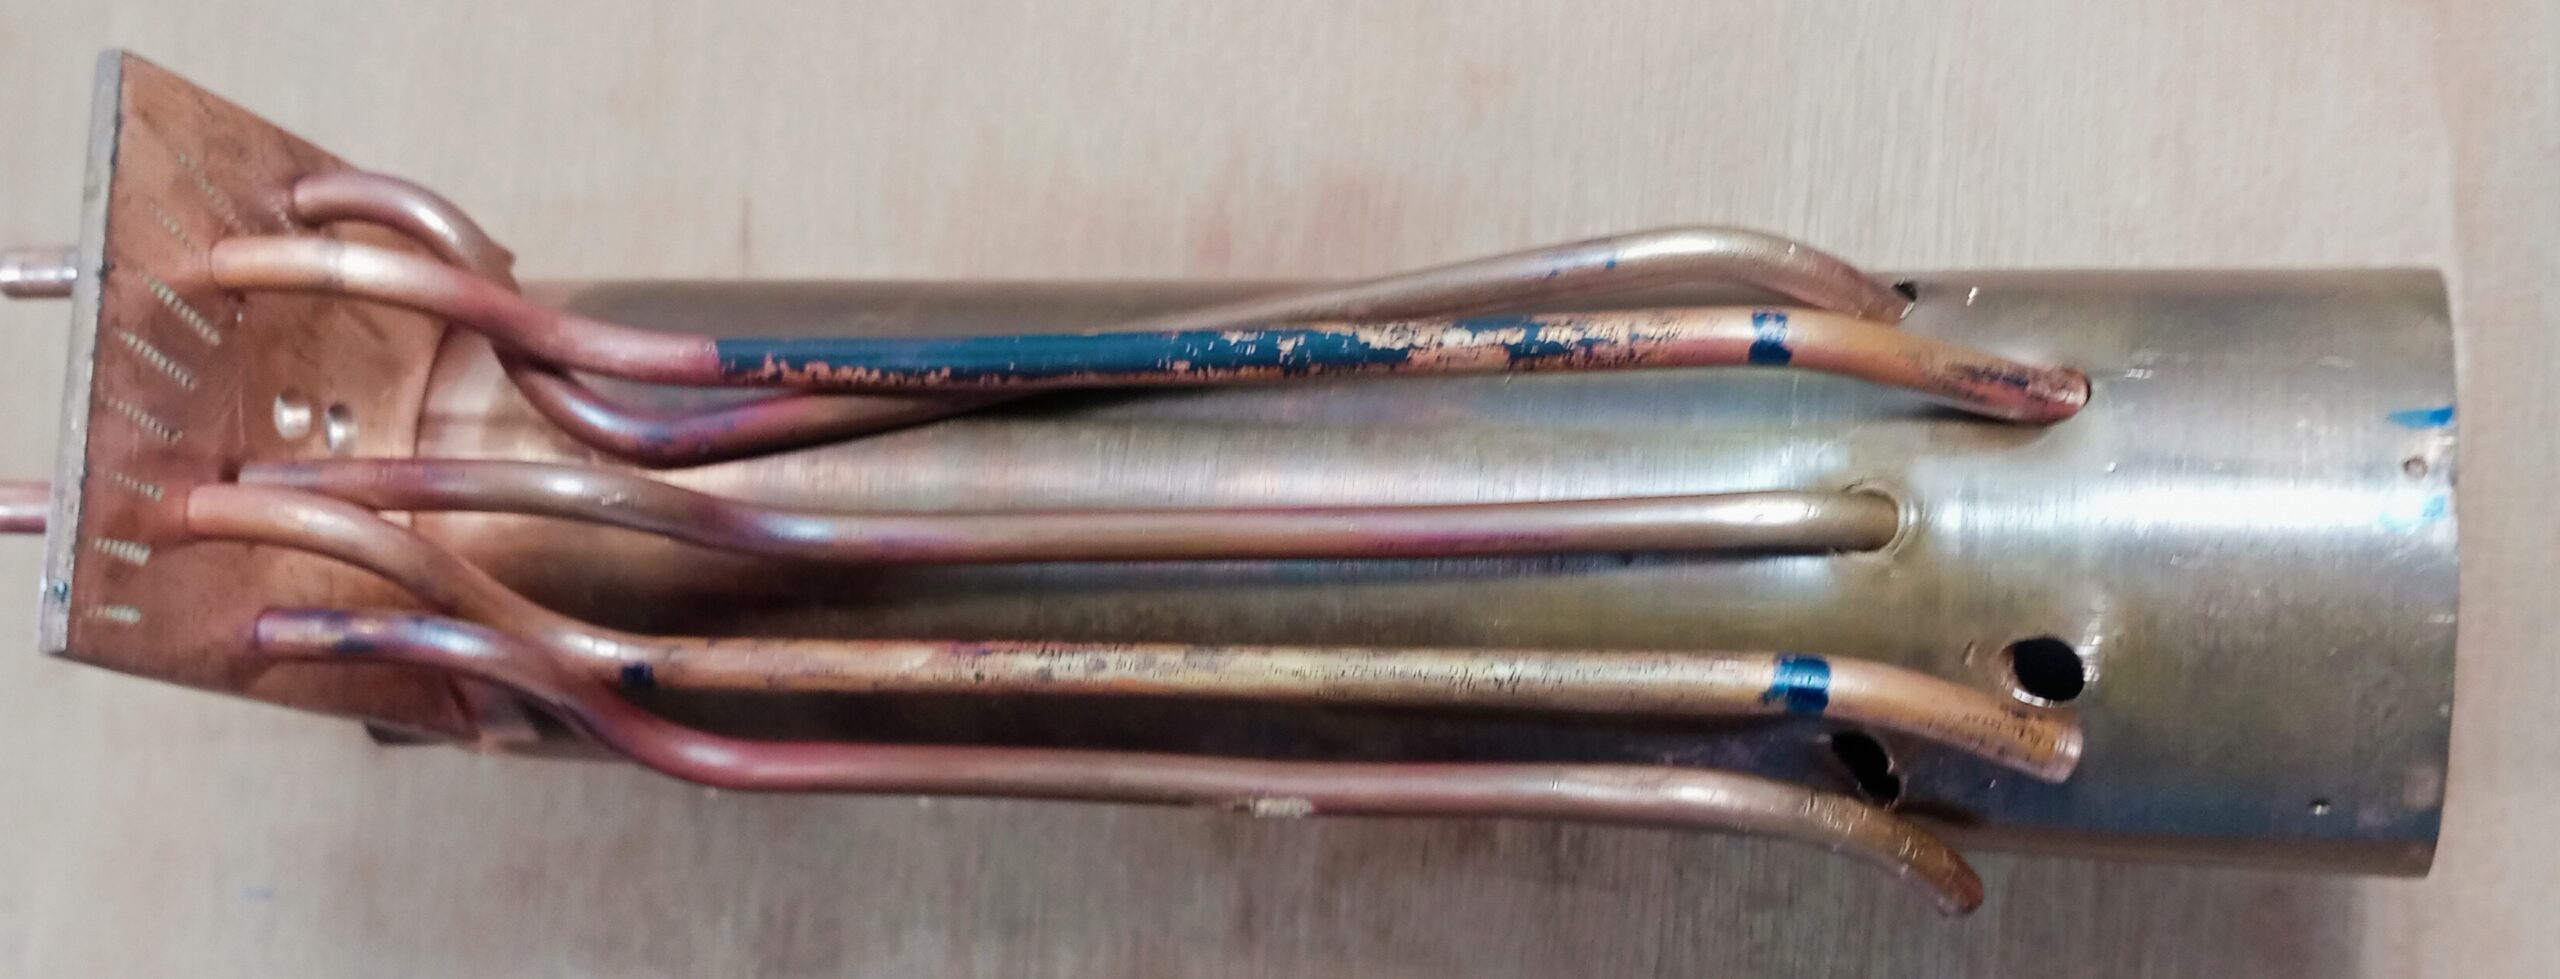
BLTE Boiler Shell Showing Tubes and Tube Holes
You can see what a mess it is.
- The tubes are supposed to lie flat along the boiler shell because a boiler casing covers the tubes very closely
- There are huge gaps between the tubes and the boiler shell at the (s)hell holes. These tubes have to be silver soldered into the boiler and silver solder doesn’t like large gaps.
But It Gets Worse – The Last Two Tubes
OK, so maybe I can fit these three tubes. But I found it totally impossible to fit the last two.
If the tubes were rubber hose no problem. But even annealed copper although it can be bent easily by hand (and often does especially when you don’t want it to) , can’t be manipulated to enter two fixed-position holes without totally mangling the tubes.
My original intention was to silver the whole boiler (except the water tubes0 first then add the water tubes at the end.
Now, I thought maybe I could add the water tubes at the same time as the throatplate thus allowing space for the tubes to pass through the throatplate without torturing them.
No chance. With the Throatplate being free to move the water tubes wobble all over the place.
BLTE Boiler Wobbly Water Tubes 1
BLTE Boiler Wobbly Water Tubes 2
Look, it’s impossible to get the tubes into the holes in the Throatplate and the Boiler Shell at the same time.
So How To Solve This Problem?
What to do?
Honestly I don’t know. At the moment the boiler build is on hold.
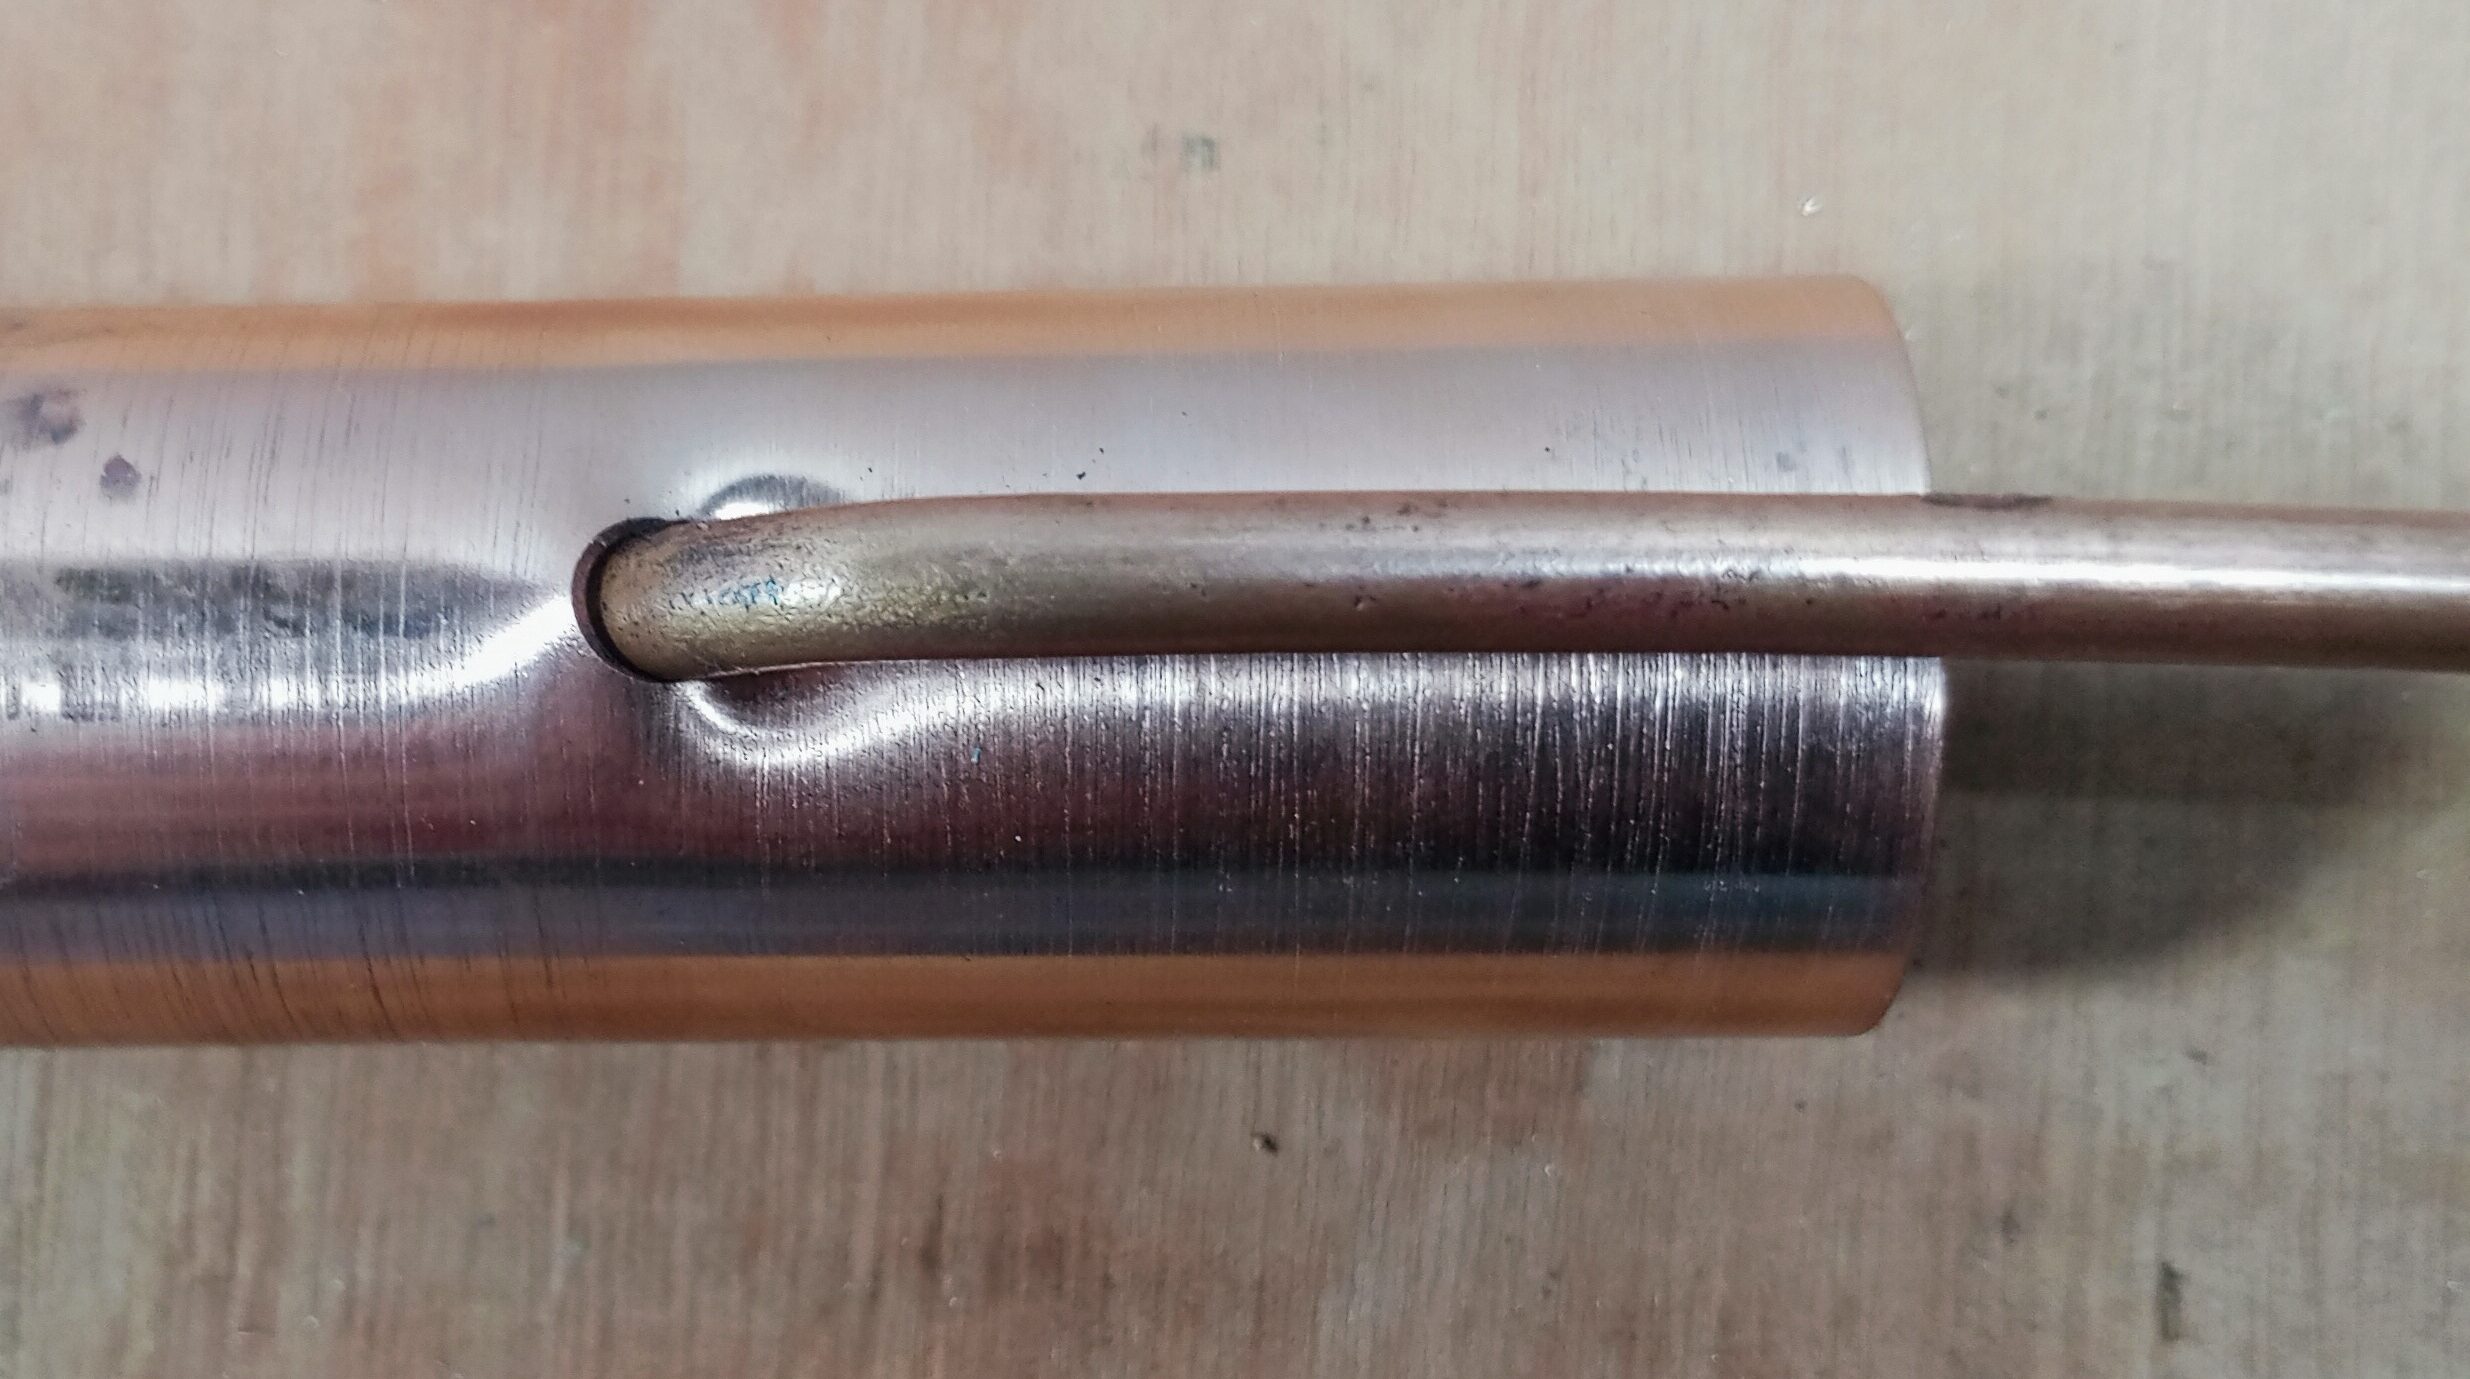
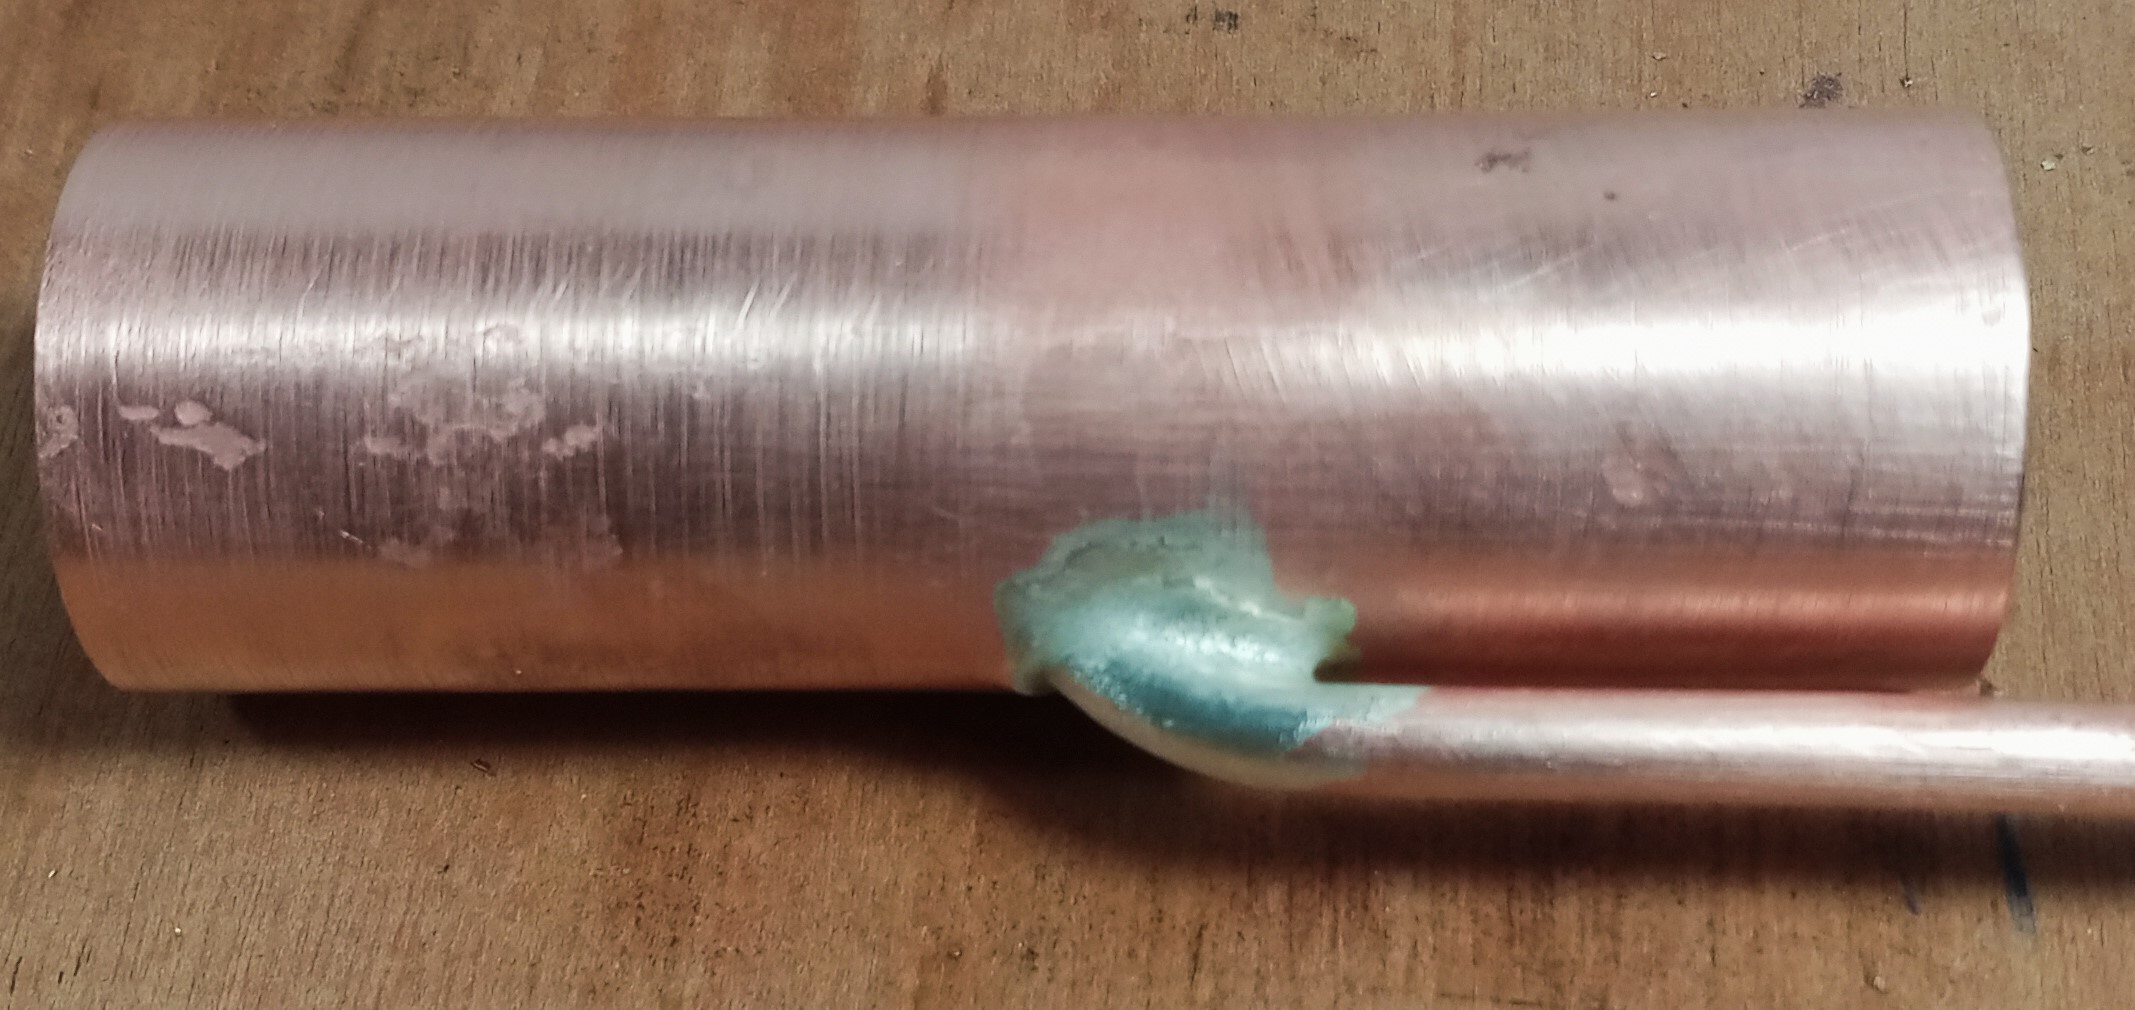
I did a test braze (silver solder) of a spare water tube into a larger tube to see if silver solder could fill the large gaps and indeed it did. The pics show a sizable gap and a pretty decent fillet.
BLTE Boiler Test Pipe and Tube Hole
In the photo above the water tube is 3/16″ diameter.
BLTE Boiler Test Braze (Silver Solder) of Water Tube
The pics show a sizable gap and a pretty decent fillet.
One Idea Being Considered
I particularly don’t like the way the copper boiler shell has to be distorted to take the water tubes. I’m thinking about putting a bronze pre-machined 90 deg elbow at each hole (5 holes, 5 elbows) to take the water tubes.
BLTE Boiler Water Tubes Elbow Idea
Although it looks neat, I see the following disadvantages:-
- More joints to silver solder = more potential leak points
- Joints touching or almost touching the boiler shell difficult to silver solder
- Still have the problem of inserting a pipe into two fixed holes.
What do you think? Please share your thoughts below.
I remember these kinds of water tubes from way back. Weren’t they called Averill Tubes (https://www.model-engineer.co.uk/forums/topic/averill-water-tubes-bat/) after the name of the man who introduced the the method of forming by pushing a round bar into the drilled tube hole then bending it down to the required angle?
Looks like that’s what you did?
HI LSTE and many thanks for your comment.
Yes, that’s exactly what I did but I think I made a mistake. I drilled the holes perpendicular to the boiler shell, with the boiler shell being in the as-bought state i.e. ‘half hard’ or at least not annealed.
So far so good. Then used the 3/16″ bar to shape the holes to the required angle – about 40 deg. This was the mistake. I should have annealed the boiler shell before using the bar. Then I would have achieved a much better formed oval hole more closely fitting to the 3/16″ waster tubes.
I believe your holes need to be much more oval shaped. Looking at the photos of the actual boiler it appears the holes were drilled at a 90 degree angle to the boiler’s surface, which would be OK if the tubes were entering the boiler at 90 degrees, but they aren’t. Looking at the freshly bent tubes, the bending angle looks to be perhaps 30 degrees,…but whatever the angle is, you need to re-drill the holes at that angle, to match the tube angle.
Since the boiler appears to be copper, re-shaping those holes to give them a good slant should be easy.
Hi Mike and many thanks for your comment on Bassett Lowke Boiler – Part 10 – Boiler Assembly (Disaster!)
You are correct and in the next build I will drill the holes at the correct angle.
By the way, things have moved on now with my boiler build and I have made more posts:-

Bassett Lowke Boiler – Part 11 Boiler Destroyed!

Bassett Lowke Boiler – Part 12 Trial Boiler Assembly
Just had a quick read.
Can you make the bend going into the boiler a right angle. Same idea as the the bronze fitting.
If you use the fitting method Hard braze the fitting onto the pipe first then silver solder the fitting into the boiler.
Might do boiler end first. Then do the throat plate end.
Hi George and many thanks for your comment. Makes sense.
Thinking more about this I’ve decided not to use the bronze bends. Instead I’m going to drill the water tube holes at the correct angle. I have a few mods I’m going to make too. More on this later.
By the way, things have moved on now with my boiler build and I have made more posts:-
Bassett Lowke Boiler – Part 11 Boiler Destroyed!Bassett Lowke Boiler – Part 12 Trial Boiler Assembly
Indeed, that looks complicated but what you yourself suggested the 90º couplings also seems the best solution to me and are one-footed with silver solder the attach.
Hi Peter and many thanks for your comment. Makes sense.
As I mentioned in a response to another comment I’ve decided not to use the bronze bends. Instead I’m going to drill the water tube holes at the correct angle. I have a few mods I’m going to make too. More on this later.
By the way, things have moved on now with my boiler build and I have made more posts:-
Bassett Lowke Boiler – Part 11 Boiler Destroyed!

Bassett Lowke Boiler – Part 12 Trial Boiler Assembly