Stuart Turner
Snapshot Update – Alan’s Model Engineering In Thailand Projects
New Big Lathe And Milling Machine Installed In The Workshop
Below is a photo of the KINWA CH 430 1100 Lathe and the ARGO Vertical Turret Milling Machine 3VH installed in my model engineering workshop in our retirement house here in Pakchong (Pak Chong), Thailand.
The walls of the workshop are now complete awaiting painting. To the right that big opening is a roller-shutter door doing what it was intended to – to let the light in.

New KINWA CH 430 1100 Lathe In Pakchong Workshop
The workshop looks a bit cluttered and it is as the single and three phase power distribution is being installed. That coil of black cable is the three phase power cable for the lathe and mill. Here are a couple of exteriors photos showing the walls:-
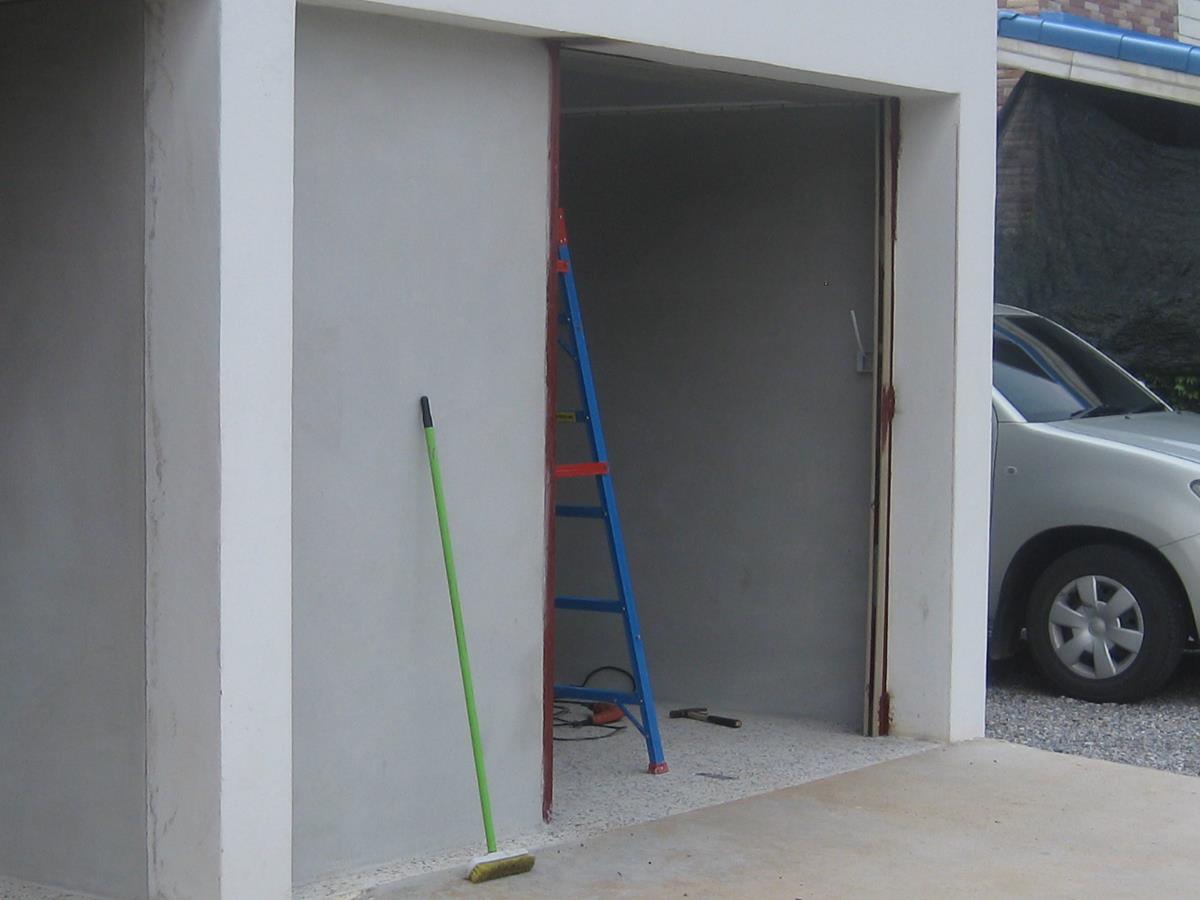
Workshop Walls 01
Above, the opening at the end is a roller-shutter door to allow access for machine tools, benches and eventually a half-size model steam traction engine to pass through!
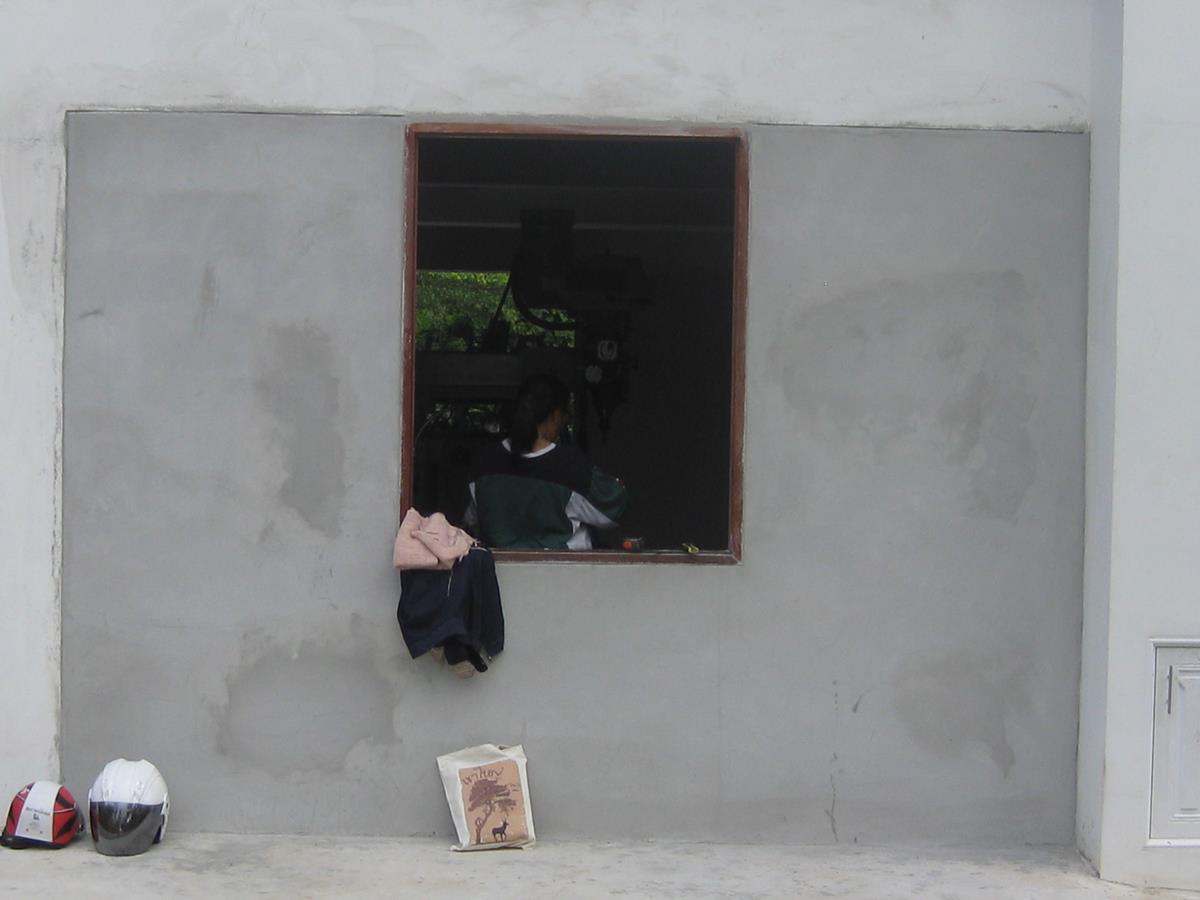
Workshop Walls 02
The photo above is at the other end of the workshop and is simply a window to match the other two on this elevation. You can only see the window frame – the shutters and security bars yet to be fitted.
The Stuart Turner Victoria Steam Engine Model
I had been struggling to make some silly little parts – the guidebar supports and spacers, on my other lathe – a combined lathe and milling machine actually.. They are only 1/4″ dia and 1/4″ and 3/8″ long respectively but they all have to be exactly the same length.
I’m on trial 3 now and have used up all the Stuart Turner supplied 1/4″ round BMS stock and most of a 12″ piece I happened to have.
Eventually I found out how to do it and they are all exactly the same length withing half a thou:-
Here are the finished spacers (two types):-
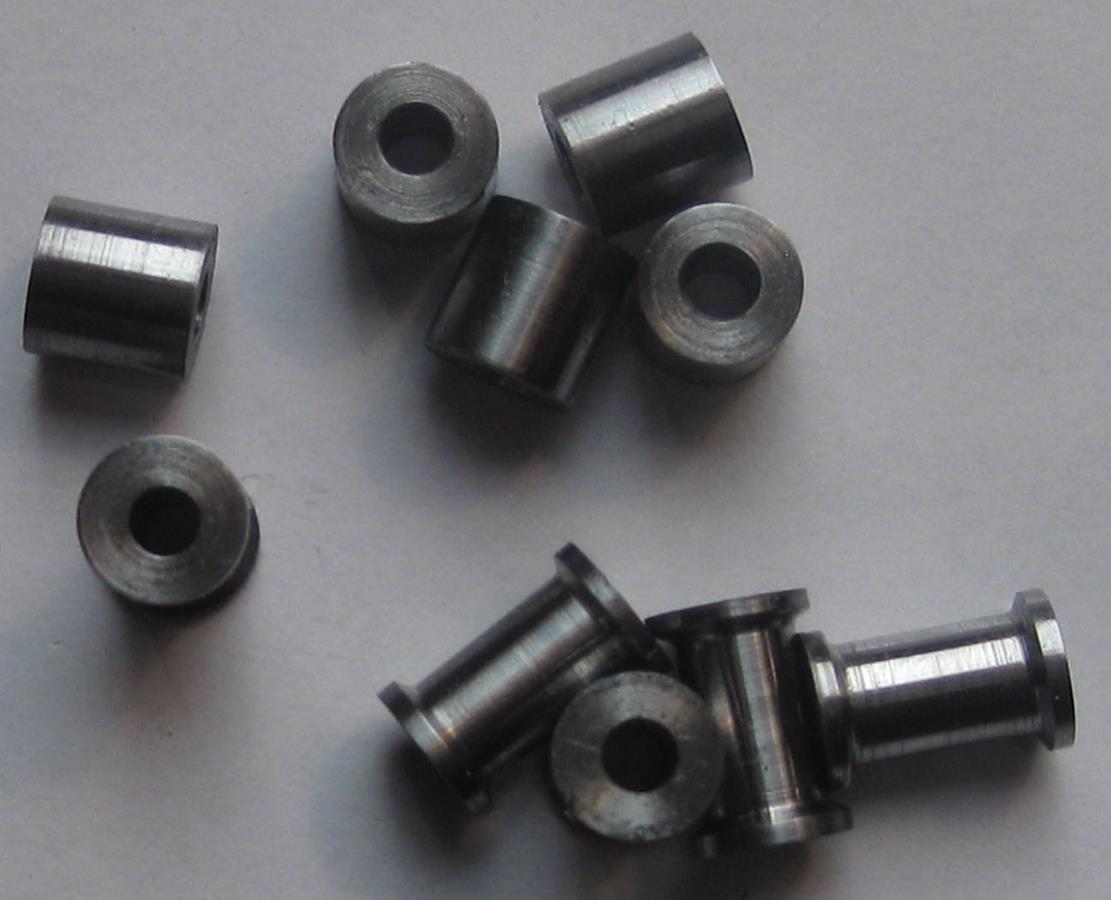
Finished Spacers Victoria Steam Engine
Buying Steel Bar
I mentioned above that I was fast running out of 1/4″ bright steel bar. I needed some angle steel to fill in some gaps around one of the roller-shutter doors so off I went to get some from the local steel merchant Ying Jaleaum. Whilst buying the angle iron I bought a selection of round steel rod. I didn’t really know what I was buying I just pointed to each of the smaller size rods and asked for 2 m of it.
Here are some photos of my haul back home:-
BMS Bright Mild Steel Angle Iron Bought Pakchong Thailand
The next photo is a close-up of the round steel bar. it is all bright mild steel (BMS) as we call it and on the receipt it is called “plao kaao” in Thai which translates to ‘axle shaft white’. So now you know what to ask for.
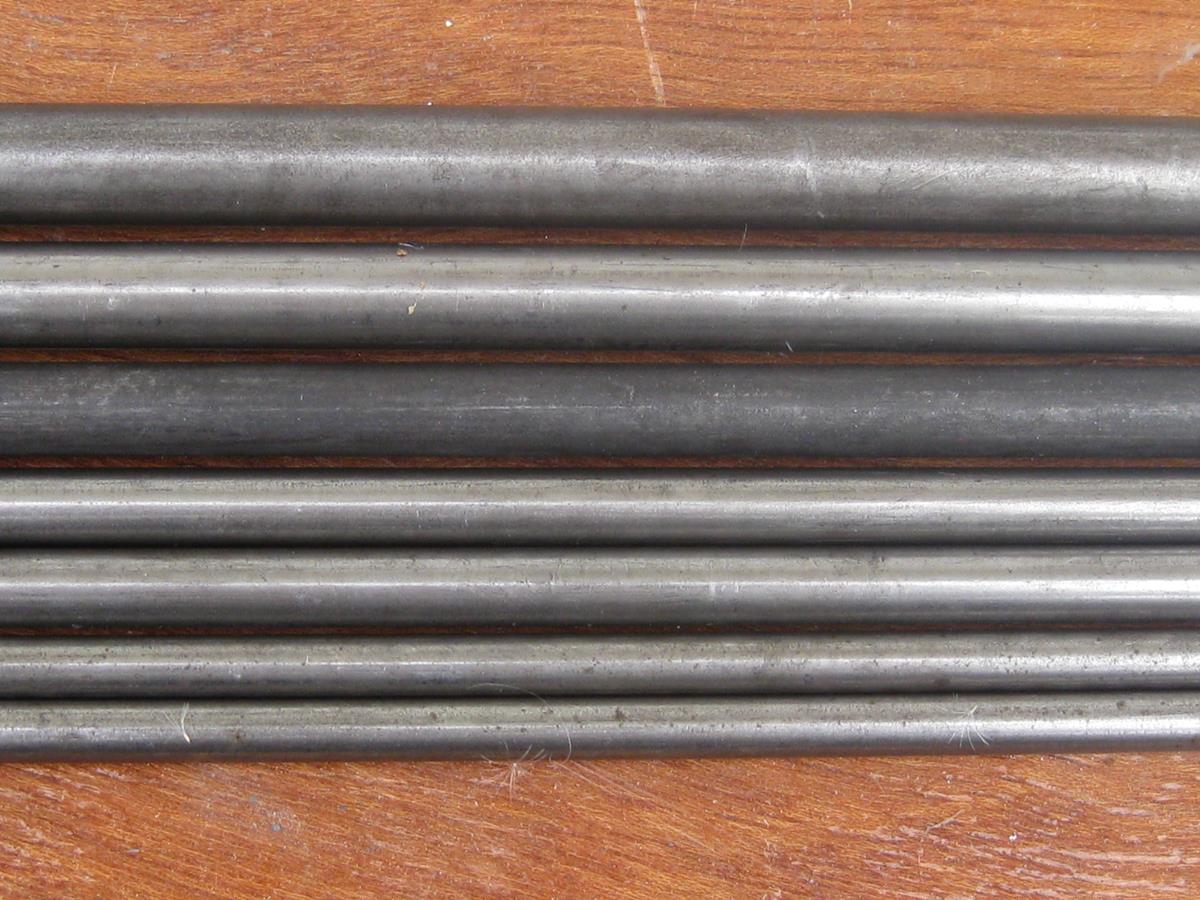
BMS Bright Mild Steel Bar Bought Pakchong
Above the round bright steel I bought in Pakchong (Pak Chong), Thailand.
The sizes are interesting. I was wondering whether they would be metric or imperial. top-to-bottom, the sizes as declared on the receipt and as I measured them are:-
| Receipt Size | Measured Size |
| 1/2″ | 1/2″ exactly |
| 3/8″ | 3/8″ exactly |
| 11 mm | 10.97 mm |
| 5/16″ | 0.314″ = oversize by 0.0015″ |
| 1/4″ | 1/4″ exactly |
The 11 mm bar although it looks like black bar is in fact bright steel.
What else is interesting is how many of the bars were exactly to the imperial diameter. In the UK BMS is traditionally undersize so that a BMS rod will never be a close fit in a reamed hole.
The next photo is a close up of the steel angle. I have included this because the steel is so precise and clean with sharp corners and the marking is very clear. Not at all the rough angle iron I am used to back in the UK.
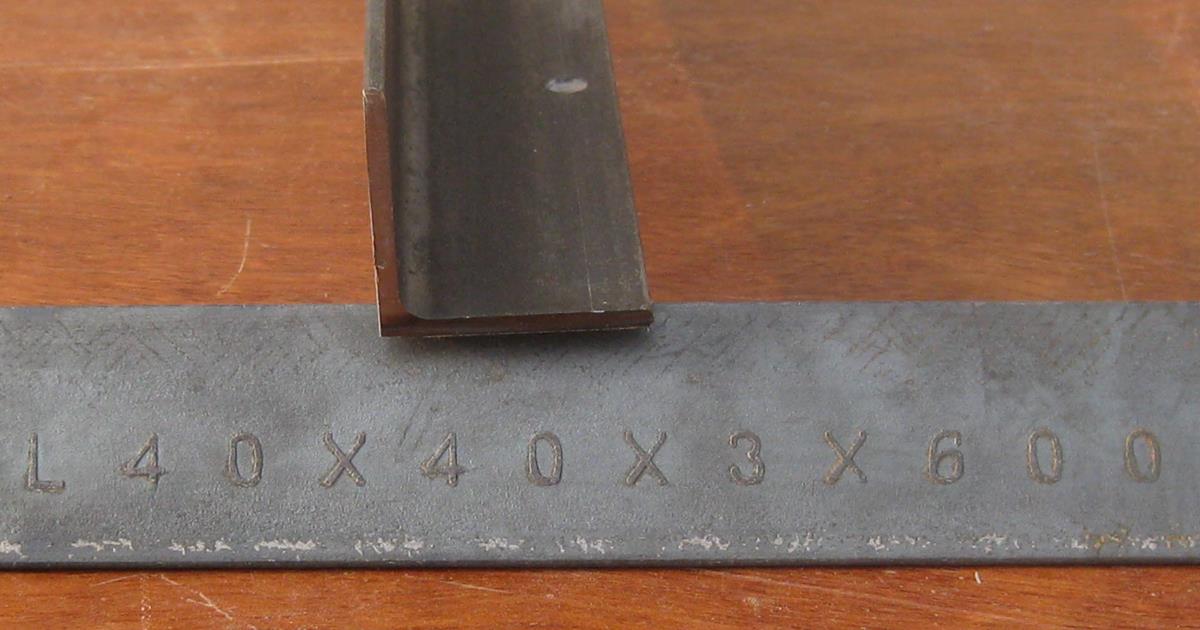
Angle Steel Bought Pakchong Thailand
Progress on Building the Stuart Turner Victoria Horizontal Steam Engine And Designing The Frame For The Makita 2107F Bandsaw
The Stuart Turner Victoria Horizontal Steam Engine
I’m still working on the base for this engine. Actually this is the second base – the Stuart Turner casting kit has the real base but it needs a sub base to sit on. The sub-base was, in the real engine, made from wood, but I had a piece of steel channel that I decided to use at least as a temporary base. I may change it for wood in the future.
The holding-down lugs have been brazed on to the channel steel base and the ends closed with plates sawn from a 1 m square sheet of 2.83 mm black steel using the Bosch GST 25M Professional jigsaw.
Now I have milled and filed down the lugd and end plates to match the steel channel and covered the whole baseplate with car body filler.
Sanding flat is in hand at the moment.
I’m sanding the base outside to keep the dust out of the workshop but because it’s a boring and slow job and it’s cold outside (16 Deg C – freezing for Thailand) I do a few rubs on the sandpaper then go do something else. Like writing this Post. Then go do another rub on the sandpaper.
Designing The Frame For The Makita 2107F Bandsaw
I’m still working on this using AutoCAD to make the drawings.
The (updated) prototype has been such a success and so useful that it’s a permanent (temporary) attachment to the work bench. It will remain so until the real one is built.
The prototype Makita 2107F Bandsaw frame on the workbench has also proven vital to obtaining some vital dimensions to use in the actuel CAD design. Centre-line of fixing screws to centre-line of cutting blade, just for one example.
General Update On What I Have Been Doing Relating To Model Engineering In Thailand In The Last Few Days
Continuing the Makita 2107F Horizontal Bandsaw Frame Design
This is still progressing in AutoCAD. The swing arm design is complete and I have managed to achieve 120 mm capacity for round material and 180 mm square material capacity without making the arm excessively long.
I’m now drawing up the base and trying to minimise the material content and weight with compromising strength and function.
Buying And Using A SESA MMA200 Arc Welder
I knew that I would want to arc-weld the Makita bandsaw frame when I build it. I have oxy-propane equipment and have welded my steel workbench using it but it is slow, uses a lot of gas and the welds are ugly.
(Its all described with photos on the Page “Setting Up A Model Engineering Workshop In Thailand – Making A Steel Work Bench” on RetiringInThailand.net website. Also there are a few more photos showing the steel sections available at the Ying ja Luem shop in Pak Chong and a photo of the tools sections.
Also in the last few days I have started to assemble the Stuart Turner Victoria steam engine (just the main pieces that are complete or semi-complete) and want to put some holding down ugs on the base which is a piece of steel channel.
I could braze them using the gas torch but I wondered if I could weld them.
So it was a good excuse to go out to buy an arc welder.
Buying And Using the SESA MMA 200 – 200 Amp DC Inverter Arc Welder
I have started a new page SESA MMA 200 – 200 Amp DC Inverter Arc Welder Review where I’ll cover the story in more detail. I have already started the story on the previous Update page at https://modelengineeringinthailand.com/update-131215/
As I mentioned in a comment the welding glasses were too dark so I tried to find something better. I couldn’t find the automatic electronic type that George mentioned but I did buy an “auto-darkening welding” filter for 350 Baht.
I also bought some welding goggles with flip down glass and that was not so dark as the welding mask that came with the welder.
Needless to say when I got home and started to try out the new glasses:-
- The auto-darkening welding filter wouldn’t fit the welding mask nor the goggles.
- The auto-darkening welding filter instruction warned to use a polycarbonate clear shield in front of it so that weld spatter doesn’t destroy the photocell sensors.
The original welding mask didn’t have a clear glass protection filter and the dark glass was peppered with weld spatter. So I decided not to try the auto-darkening welding filter until I had the protective glass.
I was able to see a bit better with the welding goggles than with the welding mask and I produced some better – but still unacceptable – welds.
Building The Stuart Turner Victoria Steam Engine
I wanted to make some small steel lugs 15 mm square (ends would be rounded) and about 3 mm thick. Also I needed two 3 mm plates 50 mm X 100 mm to fill in the ends of the steel channel base.
I had already bought a piece of black 2.8 mm steel plate a metre square from Jing Jaleaum so decided to try out the Bosch GST 25M Jigsaw again. The first cut was to remove a long strip from one side which had been flame-cut and was both extremely rough and also hard.
To cut a long story short (and I’ll be giving more detail, photos and a movie on the “Bosch GST 25M Jigsaw Review” Page it was a struggle. With sparks literally flying from the blade it’s no wonder it went blue even though I was using plenty of oil on the cut.
I then cut of a strip just over 50 mm wide for the ends of the steam engine baseplate. This went much smoother because:-
- There was no flame-cut edge that the blade and jigsaw had to deal with
- I didn’t use a guiding fence – just followed a marked-out line by hand
- I changed to a finer blade
- I discovered the speed adjusting knob!
I made a two spare for trial welding.
For the holding down lugs I cut strips of a black steel bar and then sawed them to individual lengths using a slitting saw in the milling machine. I made a few spare for trial welding.
Except where they had been cut or machined all the parts were left with the black millscale on them. Not quite the cleanest surface for brazing!
Since my second welding practice session was not successful (third session pending the clear protective glass) I decided to gas braze the lugs and end plates on a spare section of channel I had.
I started to braze one end piece then it started to rain to I left that and went on the quickly try brazing the lug. I think I melted that.
The parts are stuck together but not very neatly. I couldn’t see what I had actually achieved because of the black flux.
I have put the parts including the unused ones in a bath of citric acid to clean them up. I’ll then see what I have achieved and the citric acid will make the other parts cleaner (and remove the black mill-scale) so that my next attempt at brazing should be an improvement.
Replies to Comments Added
Andrew’s comment: https://modelengineeringinthailand.com/#comment-106
George’s Comment: https://modelengineeringinthailand.com/resources/tools/importing-tools-from-uk/rdg-tools-order/#comment-105
What I’m Up To And General Update Of The Model Engineering In Thailand Website And What I’m Up To
Victoria Steam Engine
I have been slowly building the Stuart Turner Victoria mill engine for many months.
Progress is slow because:-
- I don’t have all the small tools I need. This will be improved when I get my imported tools (see below).
- Because I don’t have these tools I get diverted into making them. Like the Makita 2107F cut-off bandsaw frame to name just one example.
- Other things interfere. Can’t say much about this but I’m always busy with other things.
Assembly Of The Part-Built Stuart Turner Victoria
I decided to give myself a boost and instead of making more of the small parts for the Victoria instead I decided to assemble the parts I had already made. These are the baseplate, the flywheel, main shaft, cylinder and main bearings.
I thought that if these are assembled it woud look like I’m making progress rather than looking at just a growing pile of parts.
The Stuart Turner baseplate itself needs another baseplate under it which is not supplied as part of the kit. It should be made from wood but to cut corners and to ensure accurate alignment of the main shaft bearings, I’m using a piece of steel channel. (I may change to wood later)
I need to add some bolting-down lugs to the steel channel and to fill in the ends with steel plate.
So I made up the bar material blanks for the lugs, a laborious process of cutting from black steel and milling to size, and I made a few spare blanks to practice… arc welding.
My intention was to weld the lugs to the steel channel base.
Yesterday I purchased an Electric Arc Welder primarily for the purpose of welding up the frame for the Makita 2107F bandsaw frames.
So I decided to practice my arc welding skills using scrap steel typical of those I will use to build the Makita 2107F bandsaw frames and also the lugs for the Victoria bedplate.
The SESE MMA 200 Amp DC Inverter Arc Welder
This cost me 5,500 Baht at Ying Jaleaum and included the cables, electrode holder and welding mask.
I don’t know if that is a good price or not compared to U.K. It sounds reasonable to me but the most important this is not the price it is will it do the job?
The Results Of My Arc Welding Practice
Before I get into this subject let just mention two issues I immediately had with the SESE MMA 200 Amp DC Inverter Arc Welder:-
The Polarity Of The Cables
The instructions cleary said negative to the electrode and positive to the work.
The outlets and the connections on the machine are colour coded as are the cables:-
Negative:- Red
Positive:- Black
I would have expected it to be the other way round so I connected red to red and black to black.
Results on trial not very good.
On investigation, the red is connected to the work clamp. i.e. the opposite of what it should be.
I swapped the cables over and it worked better. Not good, but better.
Welding Glass Colour
There is probably a technical name for this but I found it very dark indeed. In fact all I could see was the arc and that was just a green coloured light.
I couldn’t see the work at all.
Results Of Practice Arc Welding Using The SESE MMA 200 Amp DC Inverter Arc Welder
Lousy.
I have done miles of arc welding in my past including welding widening rims and roll cages on racing cars that got past the scrutineers so I cant be that bad a welder.
But the results from today’s practice session were atrocious.
I have some photos but I’ll make a page devoted to Arc Welding Using The SESE MMA 200 Amp DC Inverter Arc Welder and post them there.
Needless to say I won’t be welding the lugs to the Victoria steam engine base and I won’t be welding the Makita 2107F bandsaw frames until I have this sorted out.
My next action it to go back to Ying Jaleaum ad get a lighter welding glass. Then more practice.
Updates On The Website
New Pages added:-
Importing Tools From UK
Some Examples Of Tools And Equipment I Imported (/Am Importing) From The U.K.
RDG Tools Order
An Order For Tools From RDG Tools In The UK Shipped Directly To My House In Thailand
Pages Updated:-
Comments:-
https://modelengineeringinthailand.com/#comment-77
https://modelengineeringinthailand.com/#comment-76
https://modelengineeringinthailand.com/#comment-75